Macrame is an interior accessory that is currently experiencing a renaissance. Macrame weaves are created without the use of knitting needles or crochet. This art came to Europe from the area of Ancient Babylon and Assyria. Today it wins the hearts of interior decorators and craftsmen. It is worth starting to learn how to weave macrame by learning the basic knots.
First macrame weaves – what materials are needed?
To make the first macrame weave, it is worth using a braided cotton macrame string with a thickness of 5 mm. It is dedicated to beginner craftsmen because it allows you to feel the force with which you should tighten the knots and allows you to easily make macrame. The weaves and knots made of braided cotton string also forgive many mistakes. To weave macrame, in addition to strings, you also need a stick and scissors. A tape measure will also be useful to accurately measure the length of the strings.
Macrame weave – which type is worth mastering at the beginning?
Large macramés give the impression of intricate works of art that require skill and great skill. However, this is only an appearance. What skills must be mastered to create unique macrame? There are two patterns of knots sufficient to perform aesthetic work. These are basic weaves, the combination of which will give us a wide range of possibilities. These include a flat knot called a weaver's knot and a rib knot.
The first macrame weaves - straight knot patterns and fastening loops
To make a basic knot, first tie a fastening loop on the stick. Later in your macrame adventure, you can start weaving without loops, but for beginners, fastening loops are the best way to start the project. To make a loop, simply fold the string in half, place the resulting loop over the stick and pull the two ends of the string through it. In this way, the so-called fastening loop with spine. By passing the loop under the string and pulling the ends of the string in the same way, you can obtain a smooth fastening loop. Of course, there are loops made of several strings, but to master the first macrame weave, it is enough to know the basic loop.
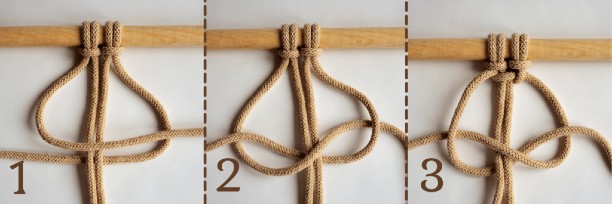
After mastering the fastening loops, you can move on to the next stage - learning knots. The simplest and most popular knot is the straight knot, also known as the weaving knot. To make it, you need four strings, i.e. two fastening loops. The two middle strings act as the core of the knot, and the two outer strings will be used to braid the core. A weaving knot is made of two half-knots: right-handed and left-handed.
To make a right-hand half-knot, take the string on the left and place it horizontally in front of the other strings. We pass the string on the right side in front and under the horizontal string, and we pass the end of this string around the back of the strings and pass it from the back through the loop created from the right string. Slowly tighten the half-knot. We create the left-side half-knot in the same way, starting from the string on the left. We place it flat in front of the strings and tie it at the front through the string on the right side. We pass the end of this string through the loop created by the string on the left side. When learning how to weave, we recommend using instructional videos or photos.
Knot posts – macrame element or keychain
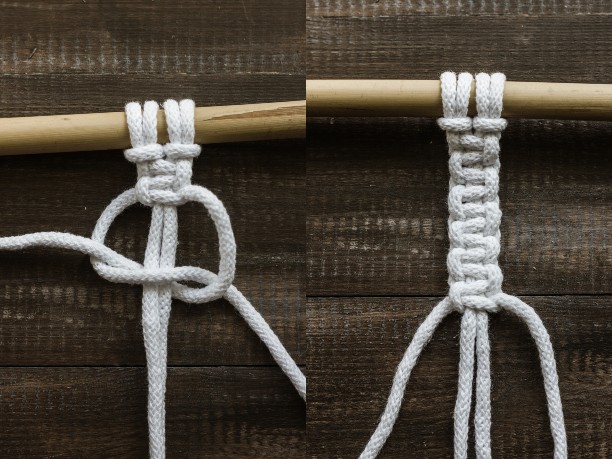
A straight knot can be used to create macrame parts. However, if mastered well, it will also enable the creation of the so-called post knots with two fastening loops. Repeating a knot under itself will create a long, knotted piece. It can be a macrame decoration, but it can also be repeated and create the so-called knot post. Repeating only left-handed or right-handed straight half-knots will make the chain take on a visually interesting spiral form. This way you can make your first key ring or bookmark.
Basic macrame weaves - horizontal rib knot
Another string weave that is worth mastering first is the rib knot, often called the rib knot. It is more demanding than a straight knot. The horizontal rib knot gives the effect of beads placed next to each other. It is one of the most popular macrame weaves. First, you need to tie any number of fastening loops on the bar or pole. Work is usually started from the left side (although this is not necessary). Two definitions are important in macrame weaving: the leading string - we wind other strings on it and the binding string with which we wrap the leading string.
The horizontal rib node is created as follows. Take the string on the left and place it horizontally along the other strings. We pass the next string from the front under the leading string and weave its end through the loop thus created. We tighten it evenly. Two loops should be created on one string (one after the other) to obtain one rib knot. Additionally, you can also create oblique and vertical rib nodes.